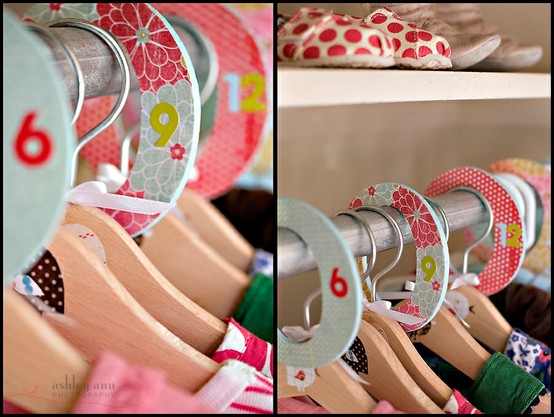
Baby clothes size dividers will assist you to organize the
clothes for your baby to avoid piling in a corner. By using baby clothes size
dividers, you will be able to place clothes to where they are supposed to be
and ensuring that you access the right size of cloth foe your baby. It is so
disappointing to reach to a drawer to pull for the wrong size of clothes for
your baby. Baby clothes size dividers
provide the solution for organizing the clothes for your baby.
For effective organization of the clothes for your baby, you need the following
- Scrapbooking paper;
- Thin cardboard;
- Straight edge;
- Pencil;
- Circular container;
- Scissors;
- Spray glue,
- Ribbon;
- Distress ink;
- Brayer
The procedure below will outline how to make a baby clothes size dividers:
1. Draw the outline of the hangers onto the pages of the scrap book of your preferred choice and cut the outlines out
2. Glue the scrapbook paper to the hangers with mod podge. Apply brayer to smoothen the surface of the paper. Wait for some time till it dries out, flip them over when they have dried out and glue the other side of the scrapbook paper and you let it also to dry. You can decide to put varying designs on the sides of the scrapbook paper. Apply ink to distress the edges of the scrapbook paper if you wish to do so
3. Creating your labels to attach to the hangers
4. Use a small piece of Velcro if you will want to change the labels when your baby grows. To do so, attach Velcro piece at the back of the label and side of the hangers
5. Loop the cut ribbon around the rod in your closet
The above steps will guide you in making one type of baby clothes size dividers. The steps below will equally guide you in creating another type of baby cloth size dividers.
1. Create a divider and take a sheet of cardboard and two sheets of scrapbook paper. Apply spray glue on the back and front of the cardboard and attach a scrapbooking paper on both sides and ensure that the pattern is facing out
2. The next step, draw two circles on your circular container and connect the circles sides using a straight edge to achieve an oblong shape
3. Cut out the shapes using your scissors
4. Take a slightly larger circular shape which is bigger than the closet clothing bar circumference and draw out your divider at the top center
5. Cut an angle consistent with all dividers in the center circle and ensure that it is completely punched out.
6. Next, label the size divider according to the size of the clothing
7. Finally, you have everything placed to where it belongs
0 comments:
Post a Comment